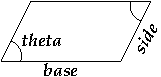
Parallelogram:
a four sided figure with parallel pairs of sides. A Parallelogram is
defined by the lengths of its two pairs of sides (labelled base
and side in the picture below) and the interior angle (in
degrees) between adjacent sides (labelled theta in the picture
below).
Your class must implement methods to provide the following functionality.
-
Parallelogramobjects are created by specifying the lengths of theirbaseandside, as well as the anglethetabetween them (in degrees) — write your constructor appropriately! -
When a
Parallelogramobject isprinted (thereby calling its__str__method), the output has the following form (wherebase,side, andthetaare replaced by the appropriate floating-point values, of course):a Parallelogram with side lengths base and side, and interior angle thetaPay attention to get this exactly right, including all the punctuation and capitalization!
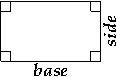
Rectangle:
a parallelogram with four right angles. A Rectangle is defined by the
lengths of its two pairs of sides (labelled base and
side in the picture below).
Your class must implement methods to provide the following functionality.
-
Rectangleobjects are created by specifying the lengths of theirbaseandside— write your constructor appropriately! -
When a
Rectangleobject isprinted (thereby calling its__str__method), the output has the following form (wherebaseandsideare replaced by the appropriate floating-point values, of course):a Rectangle with side lengths base and sidePay attention to get this exactly right, including all the punctuation and capitalization!
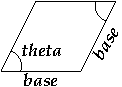
Rhombus:
a parallelogram with four equal sides. A Rhombus is defined by the length
of its sides (labelled base in the picture below) and the
interior angle (in degrees) between adjacent sides (labelled
theta in the picture below).
Your class must implement methods to provide the following functionality.
-
Rhombusobjects are created by specifying the length of theirbaseand the anglethetabetween adjacent sides (in degrees) — write your constructor appropriately! -
When a
Rhombusobject isprinted (thereby calling its__str__method), the output has the following form (wherebaseandthetaare replaced by the appropriate floating-point values, of course):a Rhombus with side length base and interior angle thetaPay attention to get this exactly right, including all the punctuation and capitalization!
Square:
a parallelogram with four equal sides and four right angles; both a
Rectangle and a Rhombus. A Square is defined by the length of its sides
(labelled base in the picture below).

Your class must implement methods to provide the following functionality.
-
Squareobjects are created by specifying the length of theirbase— write your constructor appropriately! -
When a
Squareobject isprinted (thereby calling its__str__method), the output has the following form (wherebaseis replaced by the appropriate floating-point value, of course):a Square with side length basePay attention to get this exactly right, including all the punctuation and capitalization!
In addition, if s is an object from any one of these classes,
then the call s.area() must return the area of
s. Note that the formula to compute the area of a
parallelogram is: base × side ×
sin(theta).
Warning: function math.sin in Python expects
its argument to be an angle given in
radians — take a look at the function
math.radians to convert between degrees and radians.
Throughout, make appropriate use of inheritance to reduce code duplication: wherever possible, reuse methods from parent classes — in particular, don't forget to call constructors from parent classes when appropriate.