By this point in CSC148, we have studied several different abstract data types and data structures, and most recently looked at tree-based data structures that can be used to represent hierarchical data. On this assignment, you’ll explore a new tree-based data structure known as a prefix tree, which is a particular kind of tree used to store large quantities of data organized into a hierarchy by common “prefixes”.
You’ll first implement this new data structure and then apply it to a few different problem domains, one of which is a text-based autocompletion tool similar to what online search engines like Google use.

Logistics
- Due date: Tuesday, November 28 before 12pm noon Eastern Time.
- This assignment may be completed individually or with one partner.
- See the MarkUs wiki for instructions on forming a partnership on MarkUs.
- All policies on Policies and Guidelines: Assignments apply. Please review that page carefully.
- You will submit your assignment solutions on MarkUs (see Submission instructions at the end of this handout).
- Unlike the weekly preps, you are not provided automated tests on MarkUs. We have provided some sample tests in the starter files, and part of completing this assignment is adding your own to be thorough with your testing.
- All students may request an extension of up to four days by completing the form found on the Course Syllabus.
Starter files
To obtain the starter files for this assignment:
- Login to MarkUs and go to CSC148.
- Under the list of assignments, click on Assignment 2.
- To access the starter files, you’ll first need to either create a group or indicate you are working individually. You can change this later if you decide to partner with another student.
- Then, click on the Download Starter Files button (near the bottom of the page). This will download a zip file to your computer.
- Extract the contents of this zip file into your
csc148/assignments/a2folder. - You can then open these files in your PyCharm
csc148project, just like all of your other course materials.
General instructions
This assignment contains a series of programming tasks to complete. This is similar in structure to the Weekly Preparation Synthesize exercises, but more complex. Your programming work should be completed in the different starter files provided (each part has its own starter file). We have provided code at the bottom of each file for running doctest examples and PythonTA on each file.
Like the prep exercises, this assignment will be automatically graded using a combination of test cases to check the correctness of your work and PythonTA to check the code style and design elements of your work.
The problem domain: autocompleters and prefix trees
Please begin by reading the following textbox to learn about the main new abstract data type and data structure you’ll work with for this assignment.
The Autocompleter ADT
The Autocompleter abstract data type (ADT) stores a collection of values, where each value has an associated weight (a positive number). Any type of value can be stored in an Autocompleter.
When we store a value, we must specify not just the value and its weight, but also an associated list called the prefix sequence of the value. The form of these prefix sequences depends on how we want to use the Autocompleter. Here are some examples:
- A list of integers like
[1, 2, 3]could have an associated prefix sequence that’s just the list itself. - A string like
'cat'could have an associated prefix sequence that’s the list of the characters of the string:['c', 'a', 't']. - A string like
'hello world'could have an associated prefix sequence that’s the list of the words in the string:['hello', 'world'].
The Autocompleter ADT itself does not specify how these
prefix sequences are chosen, just as how a Python dict
doesn’t care about the type of its keys or values. As we’ll see on this
assignment, different client code will use different types of values and
prefix sequences depending on its goals.
Autocompleter operations
The Autocompleter ADT supports the following operations:
- __len__: Return how many values are stored by the Autocompleter.
- insert: Insert a value into the Autocompleter with an associated weight and prefix sequence.
- autocomplete: Return a list of values in the Autocompleter that match a given prefix. The user may optionally specify a limit on the number of values returned (more on this later).
- remove: Remove all values in the Autocompleter that match a given prefix.
It is mainly the autocomplete operation that
distinguishes this abstract data type from Python’s built-in lists and
dictionaries. Both the autocomplete and
remove operations accept a list as a input prefix. We
say that a value in the Autocompleter matches the given list as a
prefix if the prefix sequence used to insert the value starts with
the same elements as the input prefix. (In Python, we can write
“lst1 starts with the elements of lst2” with
the expression lst1[0:len(lst2)] == lst2.)
So unlike the regular Set ADT, which supports searching for a
specific value (i.e., __contains__), an Autocompleter
allows the user to search for multiple values at once by specifying a
prefix that matches multiple values. For example, suppose we have a
prefix tree with the following values and prefix sequences inserted:
- value:
'cat', prefix sequence:['c', 'a', 't'] - value:
'dog', prefix sequence:['d', 'o', 'g'] - value:
'care', prefix sequence:['c', 'a', 'r', 'e']
Then if we perform an autocomplete operation with the prefix
['c', 'a'], we expect to retrieve the values
'cat' and 'care'.
Note: the empty list is a prefix of every Python list, and
so we can perform an autocomplete operation with the input prefix
[] to obtain all values stored in the Autocompleter.
Limiting autocomplete results
For very large datasets, we usually don’t want to see all autocomplete results (think, for example, about Google’s autocompletion when you start typing a few letters into its search box). Because of this, the autocomplete operation takes an optional positive integer argument that specifies the number of matching values to return. If the number of matches is less than or equal to the limit, all of the matches are returned.
When the number of matching values exceeds the given limit, how does the Autocompleter choose which values to return? This is where the weights come in, but not how you might expect. We will NOT simply return the matching values with the largest weights—doing so is tricky to do efficiently! Instead, in Part 2 of this assignment you’ll implement an autocompletion operation that will take weights into account, but in a limited way.
The prefix tree data structure
There are many ways you could implement the Autocompleter ADT using what you’ve learned so far. You might, for example, store each value, weight, and prefix sequence in a list of tuples, and then iterate through the entire list in each autocomplete operation. This approach has the downside that every single tuple would need to be checked for each autocomplete (or remove) operation, even if only a few tuples match the given prefix.
To support the required operations in an efficient manner, we will use a tree-based data structure called a simple prefix tree. Here is the main idea for this data structure:
- Every leaf of a simple prefix tree stores one value and corresponding weight that was inserted into the tree.
- Every internal node stores a common prefix of each of its descendant values. That is, it stores a list that is a prefix of every prefix sequence of each leaf value descended from it.
- The root value is always
[]. Each non-root internal node’s list has length one greater than its parent’s value. In other words, the prefixes stored in the internal nodes always grow by 1 element as you go down the tree.
Example simple prefix tree
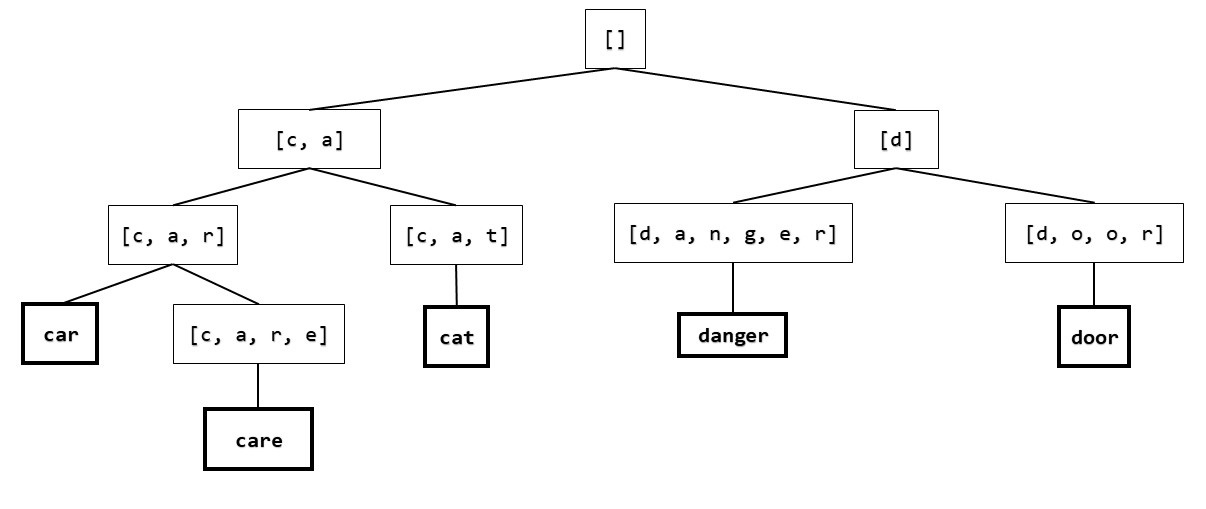
This is a bit abstract, so let’s look an example. Suppose we want to store these strings:
'car', 'cat', 'care', 'dog', 'danger'We want to autocomplete on these strings by individual letters, and
so a prefix sequence for each string is simply a list of the
individual characters of each string. For example, the prefix sequence
for 'car' is ['c', 'a', 'r'].
Here is a simple prefix tree for these five strings (we’ve omitted quotation marks and weight values):

The root of the tree is [], the common prefix for all
strings in the tree. The root has two children, with values
['c'] and ['d'], which divides the words into
two groups based on their common first letters. Each subtree then is
further subdivided by longer and longer prefixes, until finally each
leaf stores one of the five original strings. Pay attention to types
here: in this simple prefix tree, each internal value is a list of
strings that represents a prefix, and each leaf value is a single
string, which is the original value the prefix tree stores.
As we mentioned above, there is a straightforward parent-child relationship between internal values: each prefix in a parent is extended by one element to obtain the prefix in the child. This makes the overall tree structure very predictable, and in particular, the path from the root to a leaf contains all the prefixes of the leaf value’s prefix sequence, in increasing order of prefix length.
You might notice that many of these internal values seem redundant,
as they trace out just a single path to a leaf (e.g.,
'danger'). This is why we call this kind of prefix tree a
simple prefix tree: its structure is very predictable, but also
wasteful in terms of the overall tree size. We’ll address this
limitation in the last part of this assignment.
Prefix tree weights
The last concept to cover is how prefix trees store the weights of the values that have been inserted. This is done as follows:
- Every leaf stores the weight of the value stored in the leaf.
- Every non-leaf tree stores the sum of the weights of the the leaves in that tree.
For reasons that will become clear in Part 2 of this assignment, every list of subtrees must be sorted in non-increasing order of weight.
Part 1: Beginning with
SimplePrefixTree
Your first task will be to get familiar with the main classes you’ll
use on this assignment. Open a2_prefix_tree.py and read
through the provided starter code for the Autocompleter and
SimplePrefixTree classes (ignore
CompressedPrefixTree for now).
Part (a): Simple tree methods
Make sure you review all of the starter code carefully. In
particular, pay attention to SimplePrefixTree’s
four three attributes and all of the
representation invariants.
Then when you are ready, implement the first four methods
__init__, __len__, is_empty,
is_leaf, and __len__. For
is_empty and is_leaf, you’ll need to read the
documentation carefully to determine how to tell if a
SimplePrefixTree is empty or a leaf.
Part (b): Insertion warmup (not to be handed in)
In Part (c) below, you’ll implement the first key method of
SimplePrefixTree, insert. This involves a more
complex version of the Tree insertion method you
implemented in Lab 8. So to warmup, we encourage you to open
a2_part1b.py and implement the
Tree.insert_repeat method according to its docstring.
This exercise is optional (and not to be handed in), but we strongly suggest completing it and making sure your implementation passes all of the provided doctests (and any other tests that you add) before moving onto Part 1(c).
Part (c): Insertion
Next, implement SimplePrefixTree.insert—we haven’t
provided a method header, but pay attention to the inheritance
relationship! This should tell you where to find the specification for
this method.
This method must be implemented recursively, and be
aware that you’ll need to create new SimplePrefixTree
objects to represent the different prefixes as you go down the tree. We
strongly recommend completing Part (b) before attempting this part.
Check your work!
We want you to start thinking about generating good test cases even
at this point. We have provided some basic in
a2_sample_test.py for this part and for the rest of this
assignment. Here are some ideas for more specific test cases to add to
that file:
- Inserting one value with an empty prefix
[]into a new prefix tree should result in a tree with two nodes: an internal node with an empty prefix[], and then a leaf containing the inserted value. Note that__len__should return 1 in this case, since we only count inserted values for the Autocompleter ADT, and not internal values. - Inserting one value with a length-one prefix
[x]into a new prefix tree should result in a tree with three node: two internal nodes with prefixes[]and[x], and then a leaf containing the inserted value. - Inserting one value with a length-n prefix
[x_1, ..., x_n]into a new prefix tree should result in a tree with (n+2) nodes: internal nodes with prefixes[],[x_1],[x_1, x_2], etc., and then a leaf containing the inserted value. - Check that correct weights are correctly updated for each tree (and its subtrees) after each new insertion.
Part 2: Implementing autocompletion
Now that you are able to insert values into a prefix tree, next step
is to implement autocompletion (the autocomplete method).
You should do this in two parts:
First, implement an unlimited autocomplete, where you ignore the
limitparameter and always return every value that matches the input prefix.Then, implement the limited autocomplete, using the algorithm described in the box below.
Limited autocomplete, greedy algorithm
The algorithm for a weight-based limited
autocompleteis the following:- For each subtree in non-increasing weight order, obtain any
autocompleteresults for the given prefix (this is a recursive call), and add the results to a list accumulator. Pass in the appropriatelimitargument to recursive calls so that no “extra” values are returned. - Repeat Step 1 until the accumulator’s length reaches the target limit. When it does, stop immediately and return it, without checking any other subtrees.
Why “greedy”?
Because each tree’s weight is equal to the sum of the weights of its subtrees, this algorithm isn’t guaranteed to return the matching leaf values with the largest weights. Suppose, for example, we have a
SimplePrefixTreewith two subtrees, where the first subtree has 100 leaf values, each with weight 1.0, and the second subtree has a single leaf with weight 50. Then the first subtree has a weight of 100, and this algorithm will accumulate leaves from that subtree before getting to the second subtree.This behaviour may seem counter-intuitive, but is an example of an algorithm that trades off precision for efficiency. Rather than retrieving all matching leaves and then sorting them by weight, this algorithm will only retrieve up to
limitleaves, which may be much smaller than the total number of leaves in the tree. We call it a “greedy” algorithm because it makes short-sighted choices based on the subtree weights, without knowing about the actual leaf values stored.- For each subtree in non-increasing weight order, obtain any
Note that because of the SimplePrefixTree representation
invariants, each subtree list should already be sorted in non-increasing
weight order when you call autocomplete; don’t re-sort the
subtrees inside autocomplete, as this will make your code
very inefficient. (If you find the subtrees aren’t sorted by weight
correctly, go back to your insert implementation!)
Check your work!
At this point, you should try inserting some values into a prefix
tree, and then calling autocomplete to obtain some results.
Here are some suggestions of input properties/conditions to
help you design test cases (add to this!):
- How many values in the prefix tree match the
autocompleteprefix? (0? 1? 10?) - What is the relationship between the number of matches and the
limitargument? (less than? equal to? greater than?) - If there are more matches than the specified limit, try different combinations of input weights to check that you’re returning the right matches.
Part 3: Implementing removal
Your task in this section is to implement the
SimplePrefixTree.remove method. The recursive structure is
similar to SimplePrefixTree.autocomplete, but since this is
a mutating operation, you’ll need to be careful about preserving all
representation invariants (e.g., updating weights, making sure there
aren’t any empty subtrees1).
Warning: our notion of “empty subtree” for prefix
trees is subtly different from the Tree class from lecture.
A prefix tree should be empty if it no longer stores any leaf
values that were previously inserted.
Here is an example that illustrates this.
>>> prefix_tree = SimplePrefixTree()
>>> prefix_tree.insert('cat', 1.0, ['c', 'a', 't'])
>>> prefix_tree.insert('car', 1.0, ['c', 'a', 'r'])
>>> prefix_tree.remove(['c', 'a'])  # This removes both values that were inserted
>>> prefix_tree.is_empty()  # The tree should now be EMPTY
True
>>> prefix_tree.subtrees  # More explicitly, it should no longer have any subtrees
[]
Check your work!
We strongly recommend starting with very small trees containing just a few values, and then deleting one value at a time and checking at each step that the resulting tree has the right structure and weights.
After finishing this part, you should have a complete
SimplePrefixTree class. Onto some fun applications!
Part 4: Text-based autocompletion
Next, open a2_autocomplete_engines.py. Inside are the
start of two classes LetterAutocompleteEngine and
SentenceAutocompleteEngine. Both of them are relatively
simple classes that use an Autocompleter to perform some autocomplete
actions. Both classes store strings as the values in their
Autocompleter, but differ in how they generate prefix sequences
for each string.
- The
LetterAutocompleteEngineassociates a string with the list of characters in that string, in the same way as the examples we’ve been using in the assignment handout so far. This enables it to autocomplete a string given the first few letters. - The
SentenceAutocompleteEngineassociates a string with the list of the words in that string, where whitespace is used to separate words. For example, the sentence'how are you today'would have the prefix sequence['how', 'are', 'you', 'today'].
Note that the LetterAutocompleteEngine can also take a
string with spaces in it, and each space is treated just like any other
letter. For example, the string 'how are' would have the
prefix sequence ['h', 'o', 'w', ' ', 'a', 'r', 'e'].
Your task is to complete the implementation of these two classes based on their specification and the implementation instructions in the starter code. The hardest part of each class is their initializer; the other methods should be simple calls to methods you implemented in previous parts.
Note: you’ll see the initializer docstrings mention
the configuration key 'autocompleter'. For now, you can
assume that this key’s value will always be 'simple', which
corresponds to the SimplePrefixTree class from Parts 1-3.
You’ll add to this in Part 6.
Text sanitization
Both LetterAutocompleteEngine and
SentenceAutocompleteEngine will read data from a file to
populate their Autocompleters. Real world data is often messy, and we
often sanitize (or clean) the data before using them
in the rest of our program.
You are responsible for performing two sanitization operations for any text from files given to these classes:
- Convert all letters to lowercase.
- Remove any characters that are not alphanumeric and not
space (
' ') characters. In other words, keep only alphanumeric and space characters. Remove other forms of whitespace, such as the newline character'\n'.
This sanitization should be done before inserting into an
Autocompleter. This means that your Autocompleters for these classes
should only ever receive lowercase letters, numbers, and whitespace in
both the prefixes and the string values at the leaves. It also means
that two different strings in the input data can be sanitized to the
same string! For example, the strings 'The',
'the', and even 'THE?!?!' would all be
sanitized to the same string 'the' before being added to
the Autocompleter.
Hint: look up Python’s string methods and you should find some that are useful.
Check your work!
At the bottom of a2_autocomplete_engines.py, we’ve
provided some functions to illustrate a sample run of each engine. We
have also provided a sample test in a2_sample_test.py. As
in previous assignments, we strongly recommend that you try creating
your own small dataset files yourself, as this will make it easier to
test different cases, including duplicate lines.
Part 5: Let’s make some music 🎵
Our last Autocompleter application will be a fun one: performing autocompletion on song melodies! First, some background definitions.
Musical definitions
A note represents a single sound. In Python, we
represent a note as a tuple[int, int], where the first
integer represents the pitch of the note,2 and
the second represents its duration in milliseconds. A
melody is a sequence of one or more notes. In
a2_melody.py, we’ve defined a Melody class
that stores a list of notes and a name for the melody.
An interval is the difference in pitch between two notes. And finally, the interval sequence of a melody is a list containing the differences between consecutive notes in the melody. For example, if a melody contains the sequence of notes
[(59, 300), (41, 300), (45, 600), (40, 600), (40, 600)]then its corresponding interval sequence is
[-18, 4, -5, 0].
Your task is to complete the MelodyAutocompleteEngine
class; as in the previous part, the hardest part is the initializer. You
may not modify the a2_melody.py starter file. So if you
want to write helper functions related to Melody objects,
you should define top-level functions in
a2_autocomplete_engines.py rather than add new
Melody methods.
Part 6: Compressing prefix trees
You might have noticed that SimplePrefixTree is somehwat
inefficient: because we require that every internal value be a list
that’s only one element longer than its parent, it is possible to get
very long paths down a simple prefix tree that lead to just a single
value. You can see a small example of this in the diagram of the simple
prefix tree earlier in the handout with the path leading to the word
'danger'. Let’s now formalize this type of
“inefficiency”.
Compressing prefix trees
We say that an internal value in a prefix tree is compressible if it has exactly one child, and that child is also an internal value. Equivalently, we say that an internal value is incompressible if it has more than one child or it is the parent of a leaf.
We say that a prefix tree is fully compressed when it has no compressible internal values. An empty prefix tree is fully compressed.
For example, here is a fully compressed version of the prefix tree from the start of the handout.
Intuitively, fully compressed prefix trees still contain the same information as the simple prefix trees we studied earlier on this assignment, but they have the potential to implement the Autocompleter operations more efficiently, since (intuitively) fewer recursive calls need to be made to reach the leaves of the tree.
Your final task for this assignment is in
a2_prefix_tree.py: implement the class
CompressedPrefixTree, which has the same public
interface (attributes and methods, including the initializer) as
SimplePrefixTree, except that it has different
representation invariants:
- It no longer requires than an internal node’s value has length one more than the length of its parent’s value.
- Instead, it has a new RI: the tree is a fully compressed prefix tree, and so does not have any compressible internal values.
You’ll also need to update the initializers for the three
“autocomplete engine” classes to make sure to use the
CompressedPrefixTree when given the configuration value
'autocompleter': 'compressed'.
This part is the most algorithmically challenging part of any
assignment in this course! To help you get started, here are two
different strategies you might use to implement the
CompressedPrefixTree.insert method.
- Strategy 1: implement
insertthe same way asSimplePrefixTree, except after all of the trees are created, use recursion to identify and remove any compressible nodes. - Strategy 2: implement
insertin a different way, so that new nodes are only created when necessary. This is more challenging (but more efficient) than Strategy 1, since you’ll need to figure out when a new node needs to be created and with what prefix value, depending on the existing subtrees.
Finally, if you get stuck, we strongly recommend making sure you’ve completed and tested the rest of this assignment before spending all of your remaining time on this part of the assignment.
Check your work!
After you complete this task, you should be able to run your existing
tests for SimplePrefixTree on your new class
CompressedPrefixTree, since they have the same public
interface (right?!). For the same reason, you should be able to use both
kinds of prefix trees in your autocompletion engines in Parts 4 and 5
(change the 'autocompleter' configuration value).
Submission instructions
Before submitting your work, please do the following:
- Make sure you can run every assignment file. As we explain in Running and Testing Your Code Before Submission, it is essential that your submitted code not contain syntax errors. Python files that contain syntax errors will receive a grade of 0 on all grading involving those files. You have lots of time to work on this assignment and check that each file runs (e.g., right-click -> “Run in Python Console”), so please make sure to do this regularly and fix syntax errors right away. Remember, this doesn’t mean you need to have completed the whole assignment! You can still get lots of partial credit for the work you complete as long as your code can be run by Python.
- Run your tests one last time (both doctests and pytest). This will help catch any “last-minute changes” that might accidentally have introduced a bug into your code.
- In each module, run the provided
python_ta.check_all()code to check for PythonTA errors, and fix them! Tip: most formatting errors (e.g., blank lines, whitespace) can be fixed automatically in PyCharm by using the menu option Code -> Reformat Code. - Remove any code you added just for debugging, such as
printfunction calls. Remove any large blocks of commented-out code. If you want to save an old or alternate approach, create a copy of the file instead. - Take pride in your beautiful code. 😎
Now, to actually submit your work:
Login to MarkUs.
Go to Assignment 2, then the “Submissions” tab.
If you are working with a partner, make sure you have formed a group on MarkUs.
Submit the following files:
a2_autocomplete_engines.pyanda2_prefix_tree.py. Do not submit any other files. Please note that MarkUs is picky with filenames, and so your filenames must match these exactly, including using lowercase letters.Tip: you can select multiple files at once for submission.
If you are working with a partner, only one of you needs to submit the files.
Refresh the page, and then download each file to make sure you submitted the right version.
Remember, you can submit your files multiple times before the due date. So you can aim to submit your work early, and if you find an error or a place to improve before the due date, you can still make your changes and resubmit your files.
Congratulations, you are now finished with your final assignment in CSC148. Go do something fun, have some chocolate, or do a cartwheel to celebrate! 😎

You may find it helpful to review the discussion of handling empty subtrees in Section 8.3 of the Course Notes.↩︎
You can find a chart showing the conversion between integers and standard note names here.↩︎