All the way back in Chapter 5, we
learned how to create our own simple data types in Python using the
@dataclass decorator. While data classes are very useful,
they are just one (simplified) form of classes in Python. The
@dataclass decorator takes our data class definition—its
public interface—and automatically creates an implementation of
class. This makes it very simple to create data classes, at the cost of
flexibility of implementation.
In this section, we’ll learn about how to create a Python data type
from scratch, without the automatic implementation that
@dataclass provides. In future sections, we’ll apply what
we’ve learned to defining new Python data types to solve various
computational problems.
What if we just remove the
@dataclass?
To start with, recall the Person data class example we
used when we first introduced data classes:
@dataclass
class Person:
    """A custom data type that represents data for a person."""
    given_name: str
    family_name: str
    age: int
    address: str
We were able to use this data class to create and display an instance of the class and access its attributes:
>>> david = Person('David', 'Liu', 100, '40 St. George Street')
>>> david
Person(given_name='David', family_name='Liu', age=100, address='40 St. George Street')
>>> david.given_name
'David'
>>> david.family_name
'Liu'
>>> david.age
100
>>> david.address
'40 St. George Street'
Now let’s see what happens if we remove the @dataclass
decorator from our class definition. This is indeed valid Python syntax,
but with perhaps an unexpected consequence.
# @dataclass (We've commented out this line)
class Person:
    """A custom data type that represents data for a person."""
    given_name: str
    family_name: str
    age: int
    address: str


>>> david = Person('David', 'Liu', 100, '40 St. George Street')
TypeError: Person() takes no arguments
Okay, something went wrong. Even though our class declaration still
contains attribute names and type annotations, we cannot call
Person and pass in values for those attributes. According
to the error message, Person() takes no arguments. So what
happens when we try to create an instance of Person and
pass in zero arguments?
>>> david = Person()
>>> type(david)
<class 'Person'>
We successfully created an instance of the Person class.
But what happens when we try to access the instance attributes?
>>> david.given_name
AttributeError: 'Person' object has no attribute 'given_name'
This should make sense: by just calling Person() with no
arguments, we haven’t specified values for any of the instance
attributes, so we shouldn’t expect to see a value when we access
david.given_name.
Defining an initializer
When we execute the statement david = Person(), all we
have in memory is this:
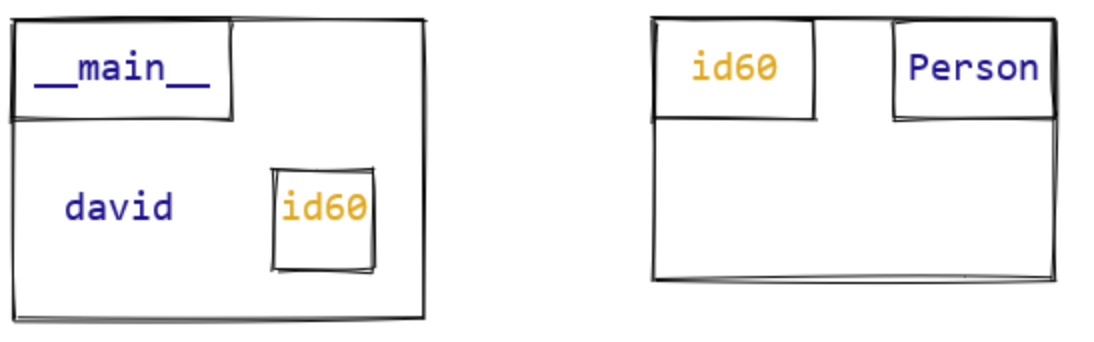
A Person object has been created, but it has no
attributes. To fix this (without using @dataclass), we need
to define a new method for Person called the
initializer. The initializer method of a class is
called when an instance of the class is created in Python. As its name
suggests, the purpose of this method it to initialize all of the
instance attributes for the new object. To distinguish it from regular
functions, Python always uses the name __init__ for
the initializer method of a class.
When we use the @dataclass decorator, the Python
interpreter automatically creates an initializer method for the class.
So let’s start by seeing what this “automatic” code for the initializer
looks like.
class Person:
    """A custom data type that represents data for a person."""
    given_name: str
    family_name: str
    age: int
    address: str

    def __init__(self, given_name: str, family_name: str, age: int, address: str) -> None:
        """Initialize a new Person object."""
        self.given_name = given_name
        self.family_name = family_name
        self.age = age
        self.address = address
Since all methods are functions, it should not surprise you to learn
that we define methods using the same keyword (def) as
other functions. However, there are two key differences between this
method definition and all top-level function definitions we’ve studied
so far. The first is that this method definition is indented so
that it is inside the body of the class Person definition.
This is how we signal that the function being defined is a method for
the Person class.
The second difference is the presence of the parameter
self. Every initializer has a first parameter that refers
to the instance that has just been created and is to be initialized. By
convention, we always call it self. This is such a strong
Python convention that most code checkers will complain if you don’t
follow
it. This name is the reason we refer to attributes as
self.<attr> in class representation
invariants. In fact, this convention is so strong that we also
typically omit the type annotation for self. We could have
written self: Person, but because the type of
self should always be the class that the
initializer belongs to, this is considered redundant in Python!
To understand how self works, let’s examine how we call
the initializer:
>>> david = Person('David', 'Liu', 100, '40 St. George Street')Notice that we never mention the initializer __init__ by
name; it is called automatically, and the values in parentheses are
passed to it. Also notice that we pass four values to the initializer,
even though it has five parameters. We never have to pass a value for
self; Python automatically sets it to the instance that is
to be initialized.
Visualizing object initialization
Let’s look at some memory model diagrams to get a better sense of
what’s going on. Here is the state of memory when the
Person.__init__ method is first called:
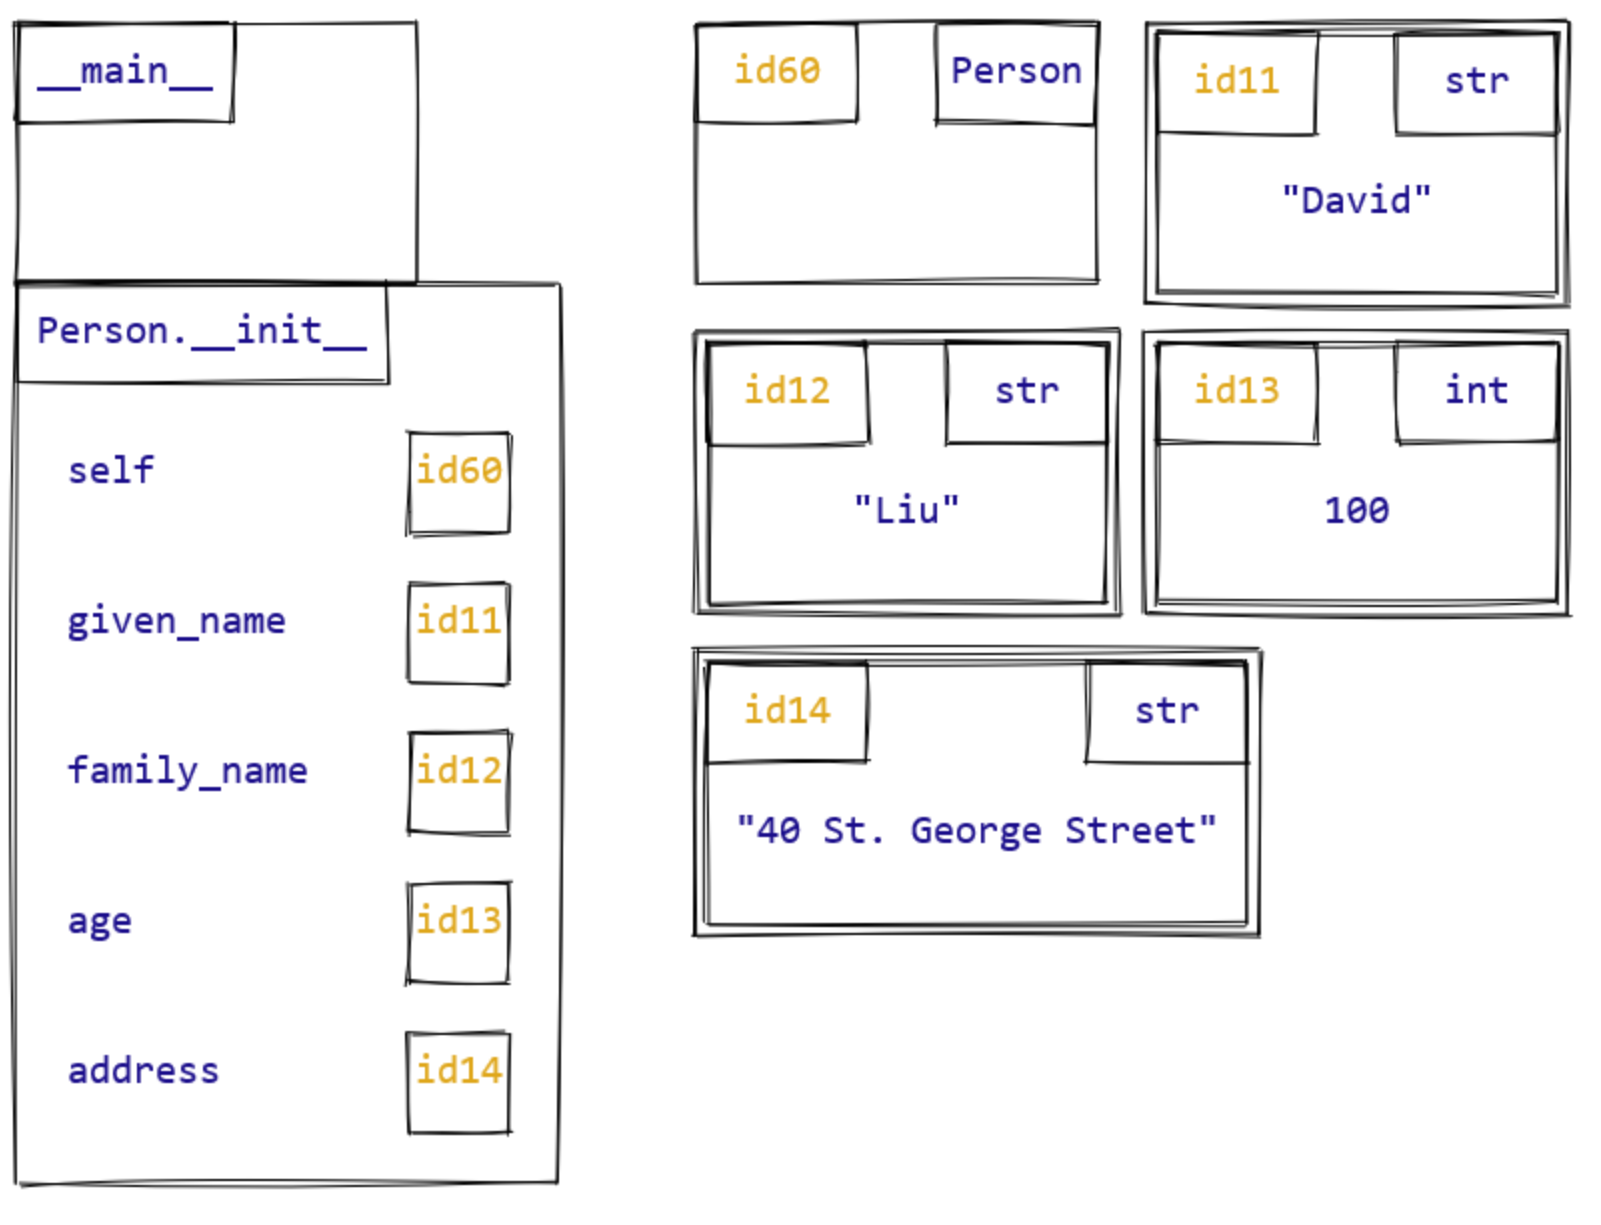
The initializer’s job is to create and initialize the instance
attributes. To do this, we use one assignment statement per instance
attribute. This uses the same dot notation syntax that we saw in Chapter
6 for assigning to instance attributes:
self.given_name = given_name, for example. Note that
given_name and self.given_name are two
different expressions! given_name is a parameter
of the initializer, while self.given_name is an
instance
attribute. Some other programming languages like Java allow you
to refer to instance attributes without using dot notation. In Python,
however, dot notation is mandatory for accessing and assigning
to instance attributes.
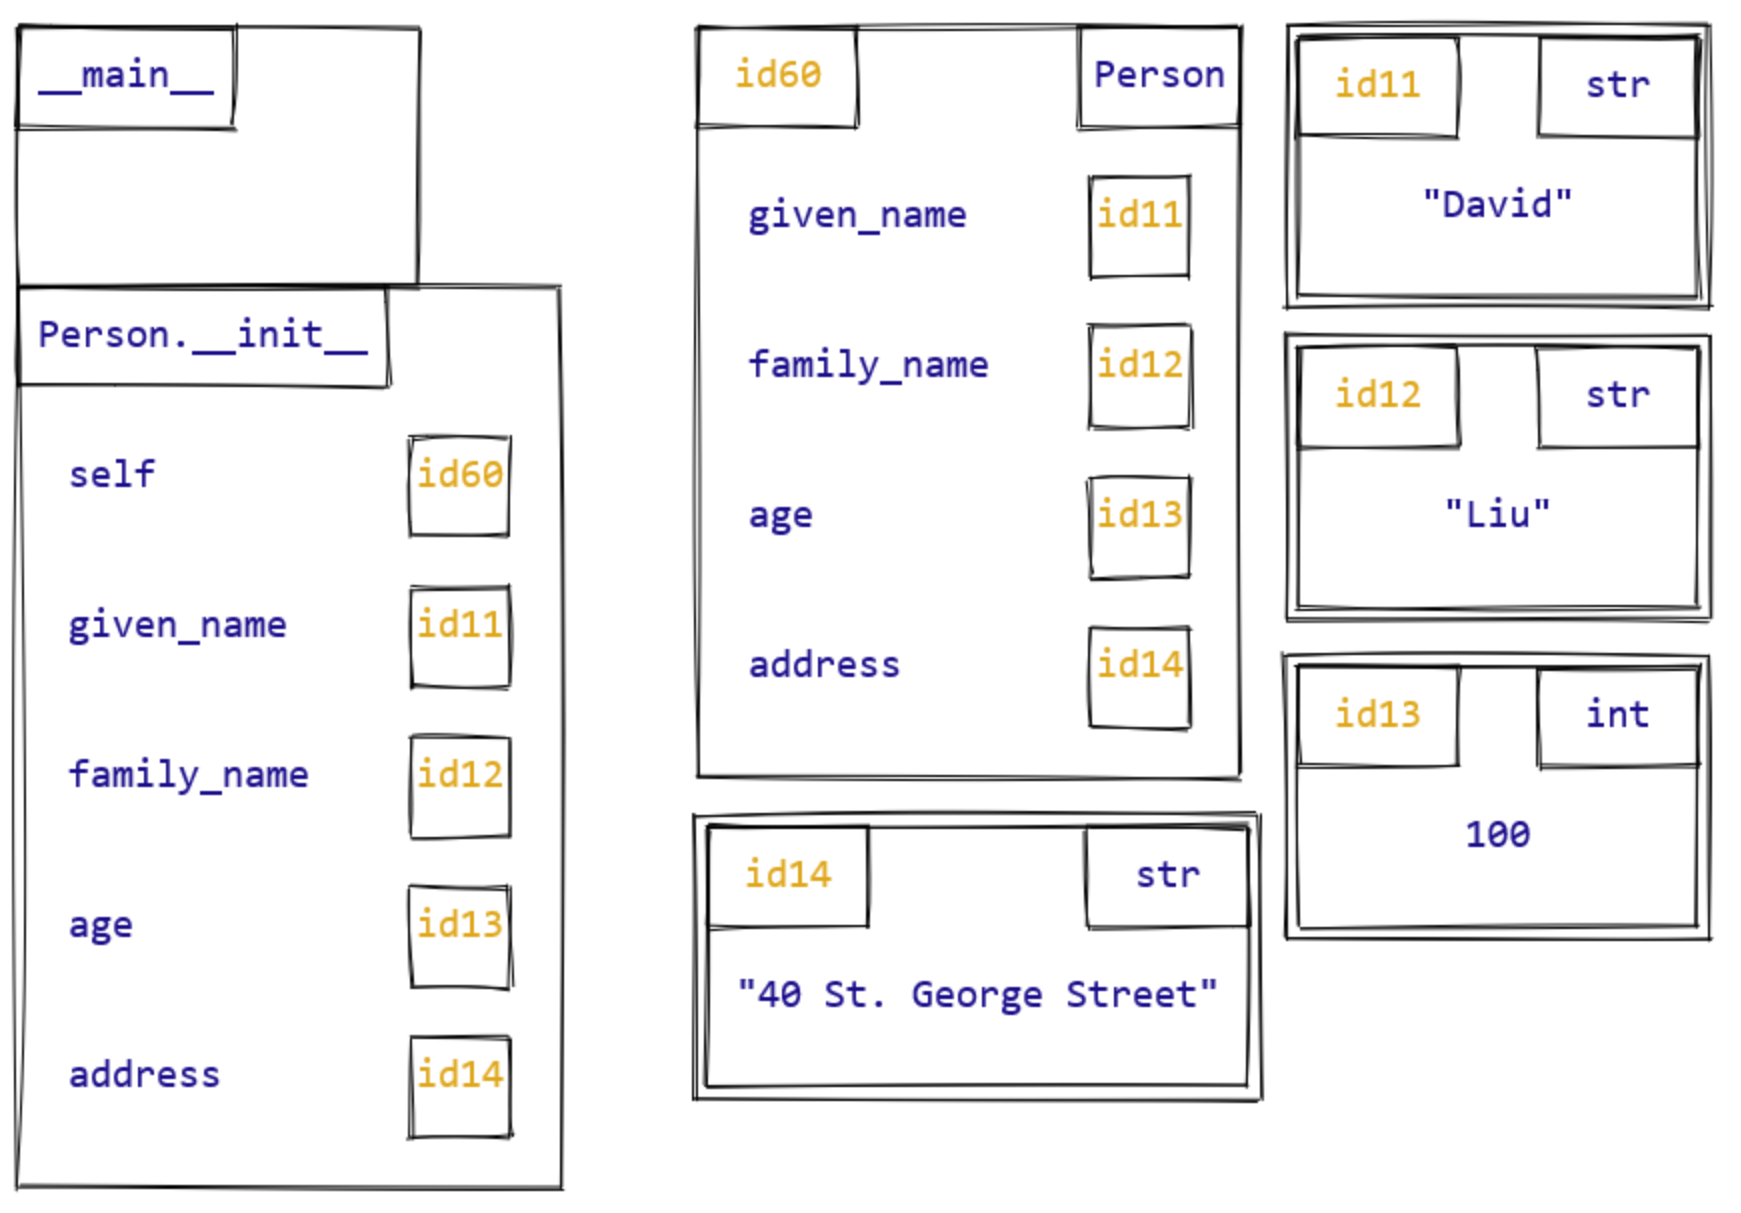
We can illustrate this distinction by showing the state of memory after all attributes have been initialized, immediately before the initializer returns:
What really happens when we create a new object
You may have noticed that the initializer return type is
None, and that the body of the function does not actually
return anything. This is a bit strange, since when we evaluate
david = Person('David', 'Liu', 100, '40 St. George Street'),
a Person object is definitely returned from the function
call and assigned to the variable david.
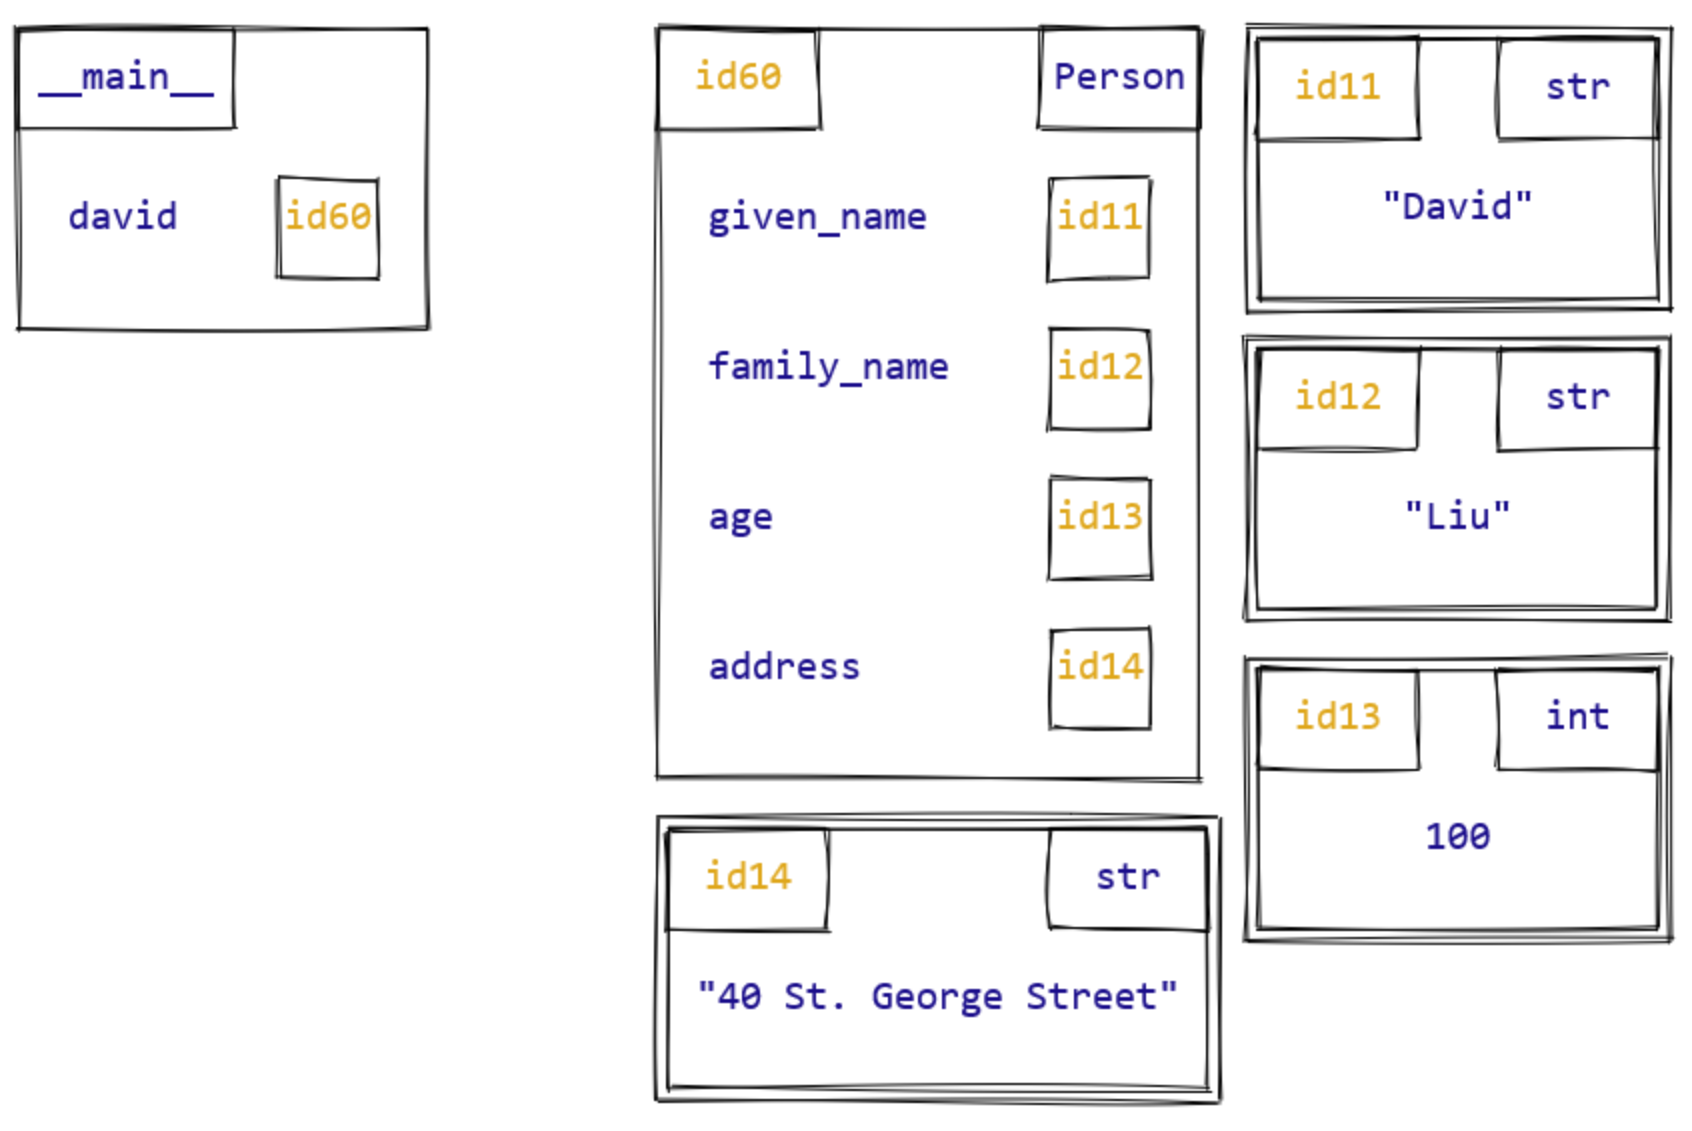
What’s going on? It turns out that calling Person
doesn’t just cause __init__ to be called. To evaluate this
call, the Python interpreter actually does three
things:Of course, this is true not just for our
Person class, but in fact every class in
Python.
- Create a new
Personobject behind the scenes. - Call
Person.__init__with the newPersonobject passed as the parameterself, along with the other arguments. - Return the new object. This step is where the
Personobject is returned, not directly from the call to__init__in Step 2.
So in fact, __init__ is a helper function in
the object creation process. Its task is only to initialize attributes
for an object; Python handles both creating the object beforehand, and
returning the new object after __init__ has been
called.
Type conversion, revisited
As you’ve probably guessed, there’s nothing special about the
Person class we’ve used as our example in this section. In
Python, every data type has an initializer, and follows the
same process we described above when the data type is called like a
function.
Back in 2.6 Type Conversion Functions, we introduced ways of converting between types, for example:
>>> int('5')
5
>>> str([1, 2, 3])
'[1, 2, 3]'
We now have the tools to understand precisely what the Python
interpreter does when we perform these type conversions. For example,
when we call int('5'), because int is a data
type, the Python interpreter does three things:
- Create a new
intobject behind the scenes. - Call
int.__init__with the new object passed as the parameterself, along with the other argument'5'. - Return the new
intobject.
Now, the Python interpreter has a special way of representing most
built-in data types, and so the initializer for int does
something a bit different than storing 5 in an instance
attribute, but the principle is the same as our Person
example.
So every time we’ve relied on a type conversion in this course, we’ve really been relying on the initializer methods of various built-in classes to implement these kinds of conversions. Pretty cool!