The last step of the Function Design Recipe is to test your code—but how? In this section, we’ll discuss the different strategies for testing code that you’ll use during the term, and beyond. As you write more and more complex programs in this course, it will be vital to maintain good habits to support you in your programming. One of these habits is developing good tests that will ensure your code is correct, and—often overlooked—using good tools to make those tests as easy to run as possible. You want to get in the habit of writing tests early in the process of programming, and running them as often as possible to detect coding errors as soon as you make them.
Doctests: basic examples in docstrings
By following the Function Design Recipe, you naturally create a few tests for each function in the form of doctest examples, the examples you write in the function docstring. The simplest form of testing your function is import your function into the Python console, and then manually evaluate each doctest example one at a time and compare the output with the expected output in the docstring. This is a form of manual testing, as it requires human interaction to complete. Manual testing is often tedious and error-prone, so while it may be good for a quick check, we can certainly do better.
Our first improvement is to use the Python library
doctest, which can automatically extract doctest examples
from docstrings and convert them into runnable tests. To use
doctest, you can add the following code to the very bottom
of any Python
file: Don’t worry about the
if __name__ == '__main__' part for now; we will discuss
this later on.
if __name__ == '__main__':
    import doctest     # import the doctest library
    doctest.testmod()  # run the tests
Then when you run the file, all of the doctest examples are automatically run, and you receive a report about which tests failed. If all tests passed, then by default nothing else is displayed, as you can see in the following demo.
The fact that nothing gets displayed when all tests pass can be a bit
confusing when first using doctest. Luckily, we can modify
how we call doctest.testmod to display all test results,
pass or fail:
if __name__ == '__main__':
    import doctest                 # import the doctest library
    doctest.testmod(verbose=True)  # run the tests and display all results (pass or fail)
One final warning: in order to use doctest, your
docstring examples must be correctly formatted and valid Python code.
For more information about the doctest module, check out Appendix B.1
doctest.
Creating test suites with
pytest
Though doctest is an extremely useful module, the
examples we write in docstrings are only simple cases meant to
illustrate typical uses of the function. As functions get more complex,
we’ll require more extensive tests to verify that they are correct. We
could put all these tests into the function docstrings, but that would
make the docstrings far too long.
So instead, we will use another Python library, pytest,
to write our tests in a separate file, and so include an exhaustive set
of tests without cluttering our code files. Let’s illustrate this with
an example. Suppose we have defined the following function in a files
trues.py: We’ve not included the body of this function, as we do
not need to know how a function is implemented in order to write tests
for it!
# In file trues.py

def has_more_trues(booleans: list) -> bool:
    """Return whether booleans contains more True values than False values.

    >>> has_more_trues([True, False, True])
    True
    >>> has_more_trues([True, False, False])
    False
    """
    # Function body omitted
Now, we’ll see how to write tests for this function in a new file,
which we’ll call
test_trues.py. By convention, all Python modules which contain tests
are named with the prefix test_. Now let us
introduce some terminology. A unit test is a block of
code that checks for the correct behaviour of a function for one
specific input. A test suite is a collection of tests
that check the behaviour of a function or (usually small) set of
functions. Every test file contains a test suite.
In Python, we express a unit test as a function whose name starts
with the prefix test_. The body of the function contains an
assert statement, which is a new form of Python statement
used to check whether some boolean expression is True or
False. Here are two examples of unit tests we could write
that are direct translations of the doctest examples from above:
# In file test_trues.py
import trues


def test_mixture_one_more_true() -> None:
    """Test has_more_trues on a list with a mixture of True and False,
    with one more True than False.
    """
    assert trues.has_more_trues([True, False, True])


def test_mixture_one_more_false() -> None:
    """Test has_more_trues on a list with a mixture of True and False,
    with one more False than True.
    """
    assert not trues.has_more_trues([True, False, False])
These unit test functions are similar to the functions we’ve defined previously, with a few differences:
- Each function name and docstring describes the purpose of the test (usually, what kind of input is being tested).
- The return type of the test function is
None, which is a special type that indicates that no value at all is returned by the function. Python’sNoneis a bit special, and we’ll see more of this later in the course. In the body of the test function, there is indeed noreturnstatement—instead, there’s anassertstatement.Another name for “assertstatement” is assertion; we will use these terms interchangeably throughout these notes.
assert statements
So what exactly does an assert statement do? An
assert statement has the form
assert <expression>, and when one is executed the
Python interpreter does the following:
First, it evaluates
<expression>, which should produce a boolean value.If the value is
True, nothing else happens, and the program continues onto the next statement.But if the value is
False, anAssertionErroris raised. This signals topytestthat the test has failed.
So when pytest “runs” a unit test, what’s actually going
on is it calls a test function like
test_mixture_one_more_true. If the function call ends
without raising an AssertionError, the test
passes; if the function call does raise an
AssertionError, the test fails. A single unit test
function can contain multiple assert statements; the test
passes if all of the assert statements pass, and fails if
any of the assert statements raise an error.
Running pytest
Finally, how do we use pytest to actually run our unit
test functions? Similar to doctest, we need to first import
pytest and then call a specific test function.
# At the bottom of test_trues.py

if __name__ == '__main__':
    import pytest
    pytest.main(['test_trues.py'])
Now if we run this file, we see that our two unit test functions are run:
Choosing good test cases
Consider the following scenario: you’ve finished writing a function
get_max which is supposed to return the maximum value in a
given list of integers. You write unit tests that call your function on
a variety of inputs, and verify that all tests pass, as shown in the
table below:
| Input list | Expected result | Test passed? |
|---|---|---|
[3, 6, 4, 42, 9] |
42 |
yes |
[22, 32, 59, 17, 18, 1] |
59 |
yes |
[1, 88, 17, 59, 33, 22] |
88 |
yes |
[1, 3, 5, 7, 9, 1, 3, 5, 7] |
9 |
yes |
[7, 5, 3, 1, 9, 7, 5, 3, 1] |
9 |
yes |
561, 1024, 13, 79, 97, 4] |
1024 |
yes |
[9, 6, 7, 11, 5] |
11 |
yes |
Can you be confident that these seven tests passing means your function works? What if you wrote twenty more test cases? 100 more test cases?
In general, it is infeasible to test a function on all possible allowed input values (for example, if a function takes an integer as a parameter, there are an infinite number of values with which the function could be called).
So, how can we be confident that our test cases all passing are evidence of our function being correct? The old adage “quality over quantity” holds true here. We want to choose test cases that are of “good quality” (meaningful), rather than simply choosing values at random.
Choosing meaningful test cases
Consider the following image, where each small circle represents a possible input value to a function we’re testing. The ones that are coloured green are values we choose to write test cases for, and the remaining blue circles are untested.
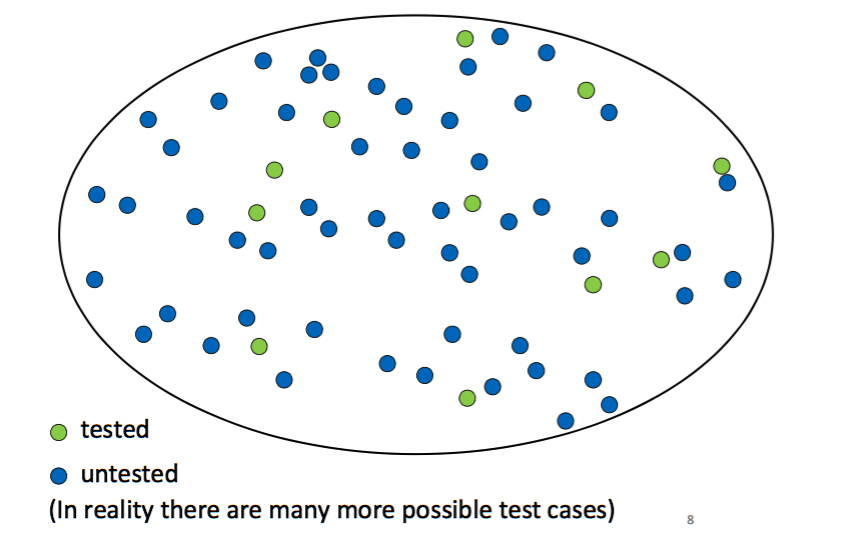
We want to believe the function is correct on every possible input. But if our test cases are chosen at random, we have no reason to believe the function is correct in the untested cases.
The goal here is to divide the possible inputs into meaningful categories:
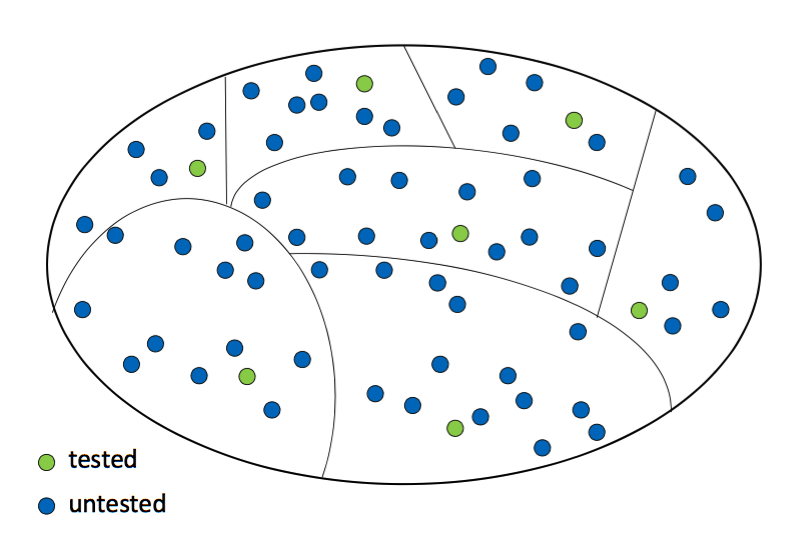
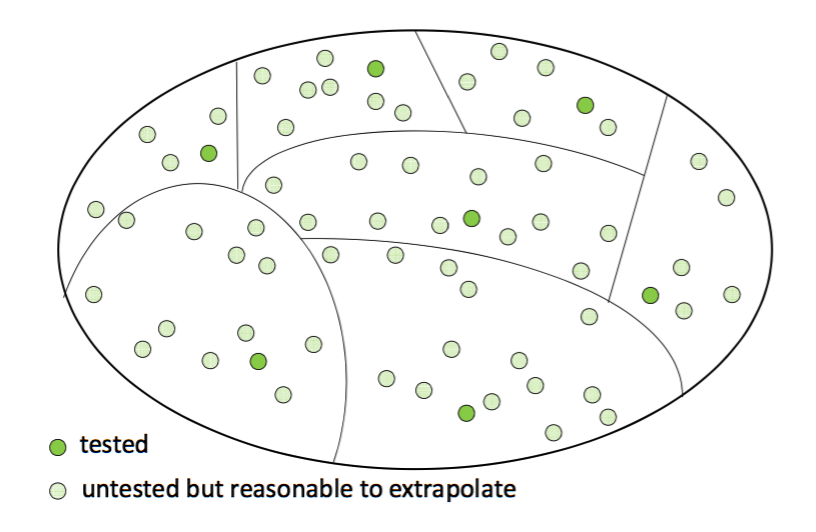
Then, we pick a representative test value from each category. If we choose the categories well, it will be reasonable to extrapolate from one test case to all other input values in the same category.
When you are first starting out with developing your own tests, it can be hard to define “meaningful” categories. Here are some general properties that you may use as guidelines for choosing test cases (if relevant to the function being tested).
Size
- This is relevant for functions that involve collections (e.g., lists, sets) and strings.
- Consider including the following categories:
- Empty collection/string
- A collection with one item/a string with a single character
- Collections with several items/strings with many characters
Boundary
If a function returns different values based on a particular
threshold, test with inputs to either side of that threshold. For
example, if we were writing test cases for the abs
function, which returns the absolute value of its input, appropriate
test inputs would be 0 and -1.
Dichotomy
Consider the different categories that are relevant to the purpose of the function, for example:
- vowels/non-vowels in a string
- even/odd integers
- positive/negative numbers
- empty/non-empty collections
Order
- For collections that have an order (e.g., lists), consider testing
different element orders.
- unsorted, non-decreasing, non-increasing
- Vary the position of any “special” element (e.g., the location of
the maximum value)
- front, middle, end
- Vary the relative positions of any two “special” elements
- adjacent, non-adjacent
Important Note: these properties are provided as a rough guide and are not a “one-size-fits-all” solution. They can assist you in choosing categories, but not all categories will be relevant in every context. Additionally, there can be significant overlap among these properties. For example, a “boundary” test case might also be considered a “dichotomy” test case. It’s important to think critically about which properties are relevant to the specific function you are testing. Each function may necessitate a different approach based on its unique characteristics and requirements. Creating an effective test suite requires careful consideration, and there is no single “right answer” to what makes a good test suite for a function. However, practising this skill will be incredibly valuable for testing the correctness of any code you write!
References
- CSC108 videos: Doctest (Part 1, Part 2)
- CSC108 videos: Writing a ‘
__main__’ program (Part 1, Part 2) - Appendix B.1
doctest - Appendix B.2
pytest